
The Serato sampler is one of the oldest performance features within Serato. Originally called the SP6 player, the Sampler now features four banks of eight virtual decks. The Sampler can be used for a variety of performance routines and can that little extra kick to your sets. In this guide, we will break down everything you need to know about using the Serato sampler.
Importing Samples Into Serato
If you don’t already have a sample pack to load into Serato, click here to download the Crossfader Sample Pack free of charge. We will be using this sample pack within our tutorial video, which you can find at the bottom of this page. Open the sampler by pressing the airhorn icon in the top left of the screen.
Once opened, you’ll be able to see the eight virtual sample decks. Loading samples is as easy as dragging tracks from either your Serato library or from external sources such as Finder or Windows Explorer.
Top Tip – Create a separate crate with all your samples in, that way if you accidentally delete a sample you can quickly find it for replacement.
Controlling the Sampler Output
The Sampler’s master volume can be controlled in the top right-hand corner or via the dedicated knob should your hardware feature sampler control. You can also mute the Sampler completely by pressing the mute icon. The output of the Sampler can also be changed here and can be selected from the following selection:
Channel 1 – Outputs through channel one on top of what deck one is currently playing
Channel 2 – Outputs through channel two on top of what deck two is currently playing
Chanel 3 (If available) – Outputs through channel three on top of what deck three is currently playing
Chanel 4 (If available) – Outputs through channel four on top of what deck four is currently playing
Auxiliary (If available) – Outputs through the auxiliary or master channel, no individual channels are affected.
Master (Multi if Auxiliary is available) – This will out the Sampler through the master channel unless auxiliary is available in which case the M stands for multi and output will be sent over all four decks.

The Sampler Decks
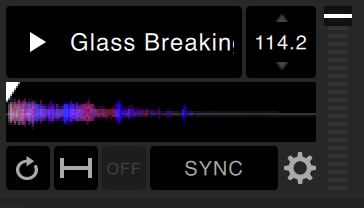
The Sampler features eight sample decks per bank. The deck shows the BPM of the loaded sample, a small waveform overview and a few easy-access controls. In the top left of the sample deck is the play button, you can change the playback settings with the two buttons found in the bottom left. The first is loop, which when activated will keep playing the sample over and over until you either un loop it or press stop (should you have on/off mode selected).
Playback Modes
To the right of the loop button is the play setting, here we can choose from three different playback modes which are:
Trigger Mode – Audio plays through until the end of the track. Pressing repeatedly will trigger the audio from the beginning of the track. To stop the audio, hold the alt key while either clicking the play button or pressing the corresponding shortcut key (e.g., alt + Z for slot 1).
Hold Mode – Audio plays only while you press and hold the sample play button or corresponding shortcut key. Upon the release of the play button, the audio stops immediately.
On / Off Mode – Audio plays right through until the end of the track. Pressing play again stops the audio and returns to the start.
On the right-hand side is an individual volume slider to control the volume of the sample. Note if the sample isn’t loud enough on full, check the samplers master volume or change the gain of the track within the advanced settings.
The BPM is also found in the top right-hand corner. You can click on the BPM value and drag up to increase the playback speed or swipe down to decrease the value. If no BPM value is set, you need to find the track within Serato’s main library and double click on the BPM field to set it manually.
Sync on the Sampler
The Sync button, when activated syncs the BPM of the sample with that of the master playing deck. You can turn sync off by pressing the off button found to the left.
Note: Sync will only work when a sample has a BPM value.
If no BPM value is set, you need to find the track within Serato’s main library and double click on the BPM field to set it manually.
The Advanced Settings
To access the advanced settings for each sample, click the cog icon in the lower right-hand side. Once inside the advanced settings, we are faced with more choices to fine-tune each sample.
. 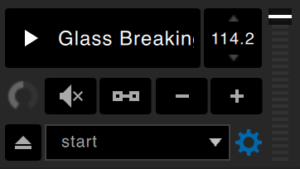
The first of the new settings available is gain control. Here we can increase or lower the gain on the given sample. Try not to use this as a volume control as that is still accessible on the right-hand side. This is just for fine-tuning any sample that may be clipping or on the quiet side. Next to the gain control, we have a mute function, great for muting individual samples whilst leaving the rest of the Sampler active.
Pitch Bending Samples
The key lock or pitch and time icon once activated allows DJ’s to increase or decrease the playback speed of the sample without changing its pitch. This is particularly helpful if you intend on using sync or changing the playback speed as it makes the change less evident to the listener. The – and + icons are nudge controls. These allow you to momentarily speed up or slow down the playback of a sample to help nudge it into time with a playing deck. Ideal for DJ’s wanting to play full tracks in the Sampler. Using it as an extra deck.
Sample Start Points
The final control is a drop-down menu which will usually show the word “start”. This box sets the start point for each sample. So with one-shot samples, you will often only have the option start. However, if you drag in a track that you have set Hot Cues and Saved Loops, you can select these and play the sample from there. The saved loops will automatically activate the loop sample option, great for making one-shot samples from existing tracks in your library!
Video Guide
Take your Serato DJing to the next level!
Level up your DJ’ing with Serato with our dedicated online courses!
Pioneer DDJ SB3 DJ Course
3.75 hours
28 lessons
Beginner
Serato DJ Course
3.5 hours
23 lessons
Beginner
Serato DJ Course
8.5 hours
47 lessons
Intermediate
Pioneer DJ DDJ-FLX4 Course
7 hours
41 lessons
Beginner

Complete DJ Package
835 hours
1300+ lessons
Creative
Pioneer DJ DDJ-FLX4 Pro Course
9.5 hours
49 lessons
Intermediate
DDJ FLX4 Beginner To Pro Bundle
16.5 hours
90 lessons
Beginner
Numark Beginner Course
4.2 hours
35 lessons
Beginner